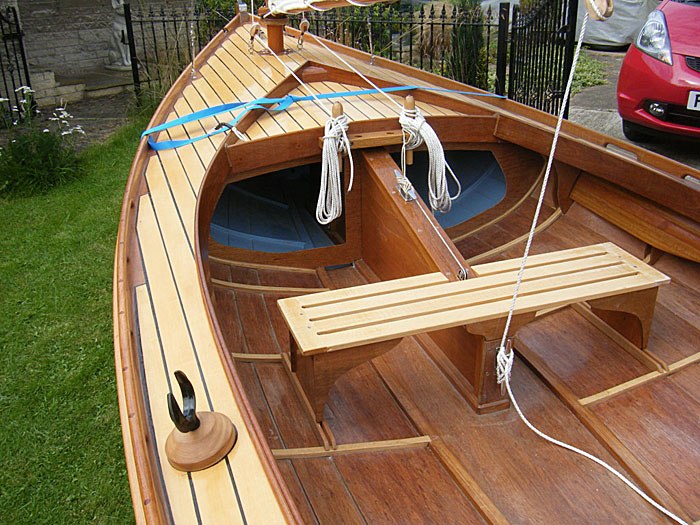
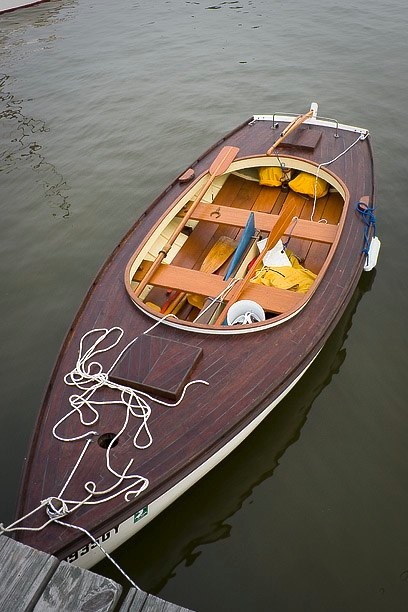
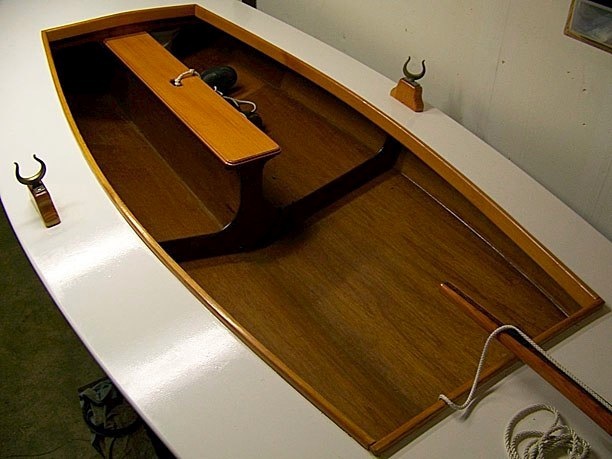
Don Scott’s centerboard trunk, with removable rowing seat.
On a project like this it’s always good to see what other people have done before starting something new, especially when it’s an element crucial to the handling of the boat. Sources can be hard to find, though, and when you do there’s usually very little evidence to help you follow how they got from A to B. This is particularly true of the centerboards as, in many cases, builders start out with daggerboards they replace months later, long after interest in documenting the project has waned. Over time, though, I’ve collected some examples of the different designs I found while researching my own.
Because there are no original plans for centerboards on the smaller Melonseeds, every builder is forced to figure out how to do it on their own, and this may account for the range of unique styles you find, more so than elsewhere on the boat. Each design becomes an expression in some way of that builder’s preferences and priorities, how they weigh the relative importance of comfort, performance and aesthetics. The variety is really surprising.
In gathering examples of what others have done, I realized there’s a loose but direct correlation between the latitude where builders are located, and the importance they place on having a comfortable cockpit, and you can see how this factor influences design and location of the centerboard case.
The Gulf Stream brings warm tropical water northward along the coast of the Southern states, keeping the ocean there relatively warm all year long. In the opposite direction, the Labrador Current channels cold Arctic water down the coast of New England from the north, keeping the Atlantic there chilly, even in summer (at least to a Southerner like me). These two currents collide head-on at Cape Hatteras, and their collision is a major reason for the shifting shoals that make the area so treacherous. But as a result of these currents, south of Cape Hatteras the need for a cockpit or cabin diminishes. There, closed hulls turn into solar ovens in the hot Southern sun, and even the water temperature approaches 90 degrees by the end of summer, so except for some shade, there’s very little need for protection from the elements. But north of Hatteras, comfortable cockpits take on far greater importance as a welcome refuge from cold wind and spray. You don’t see this difference in mass produced factory boats shipped all over the country – they look the same in Alaska as in Key West – but you can definitely see a difference in handmade boats built locally, both new and old.
Here in Virginia we experience both extremes. The shallow saucepan of the Chesapeake Bay heats up quickly in summer, getting as warm as the southern ocean. But beyond the mouth, and on the other side of the Eastern Shore, the Atlantic is chilled by the Labrador Current. The shallow Bay cools off quickly in winter, too. In fact, when I was young, visiting my grandparents on the Bay, the old timers remembered that the Rappahannock River at its mouth would freeze over so solid that ox carts and even automobiles could be driven from one shore to the other, four miles across. Even today the upper reaches can still freeze during long cold snaps. Since there’s more danger from hypothermia here than heat stroke, having a place to duck down out of a cold wind is a pretty high priority, so I want to keep the cockpits as uncluttered and comfortable as possible.
Not so in Florida, though. When I was down in Cortez last summer, I got a good look at the Melonseeds they build there, and got to sail one. They’re fun and fast boats, for sure. Roger Allen, who did the initial design, started with plans of a New Jersey Little Egg Harbor Melonseed of about 1880. He then enlarged the dimensions by 10% overall to 15 feet, and converted the daggerboard to a centerboard. Roger was kind enough to give me a copy of his plans, and it’s been fun to study them and read his notes scribbled in the margins. If I interpret them correctly, he took pains to replicate the balance of the original design with the size and placement of his centerboard, giving up some space in the cockpit to preserve the performance. However, since he enlarged the whole boat, including the cockpit, he was able to keep the area inside spacious and comfortable.
In Dave’s shop, Roger’s plans have evolved somewhat over time to suit the personal style and sailing grounds of the guys who build them. They prefer to sit up high on the deck where they can stay cool in a breeze and have a better view. Sitting down inside even an open boat in the hot Florida sun is the definition of misery, so they don’t bother with a cockpit at all, which has been reduced to something more like a footwell and a place to store life jackets and beer coolers. Instead, they use the deck like one long comfortable bench seat.
Dave Lucas takes T for a ride at MASCF 2009.
Because cockpit comfort on these boats is not an issue, the centerboard can be located in the best position to maximize performance for the large sails they use. Only a little forward of the center of the hull, starting about a third of the way back from the bow, they take up a large portion of the small area available without ever really getting in the way.
Roger Allen’s play boat, Miss Kate
John Brady, of the Philadelphia Seaport Museum, and a close cohort of Roger Allen, drew plans for a very similar enlarged Melonseed. Carl Weissinger built one several years ago of cedar strips, and it’s now sailed by Mike Wick. Mike is a good sailor and, like the Cortez boats, this one is very fast. Mike regularly wins races with it. Reflecting the colder climate where it originated, John’s cockpit is spacious, both in width and length. For the boat to sail well, however, the centerboard had to be positioned almost in the middle. To minimize the inconvenience, John kept the profile of the case low, below the bench seats, and left the slot open on top. This allows for an oversized centerboard that only protrudes when fully raised for coming ashore. The result is a large, open, comfortable cockpit, with plenty of room for gear. Mike frequently takes it for weekend camping trips with guys from the Delaware TSCA, and has trailered it from Florida to Maine.
Pepita, Mike Wick’s boat, built by Carl Weissinger
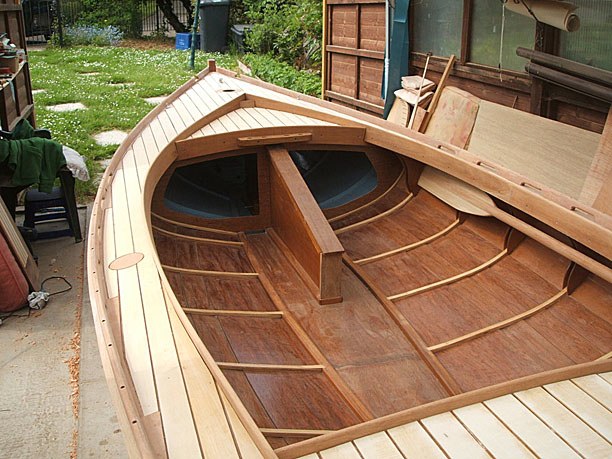
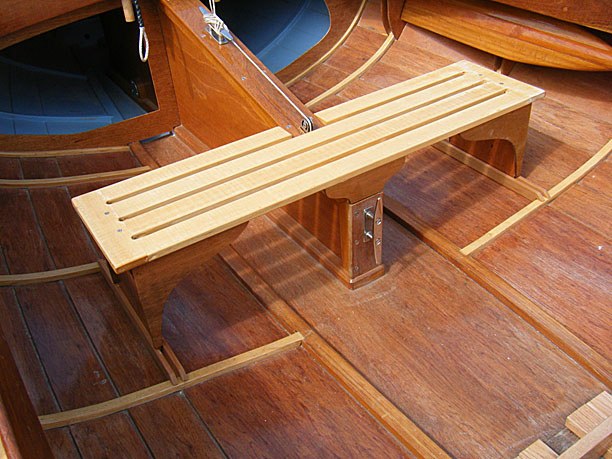
Marc Barto drew plans for two different size Melonseeds – the 13.5 foot version, similar to the ones I’m building, and a 16 foot version. For the larger boat he drew the plans to include a centerboard. Several of these boats have been built in recent years, and all that I’ve seen have been exceptionally beautiful and well made. Just recently, in England, Don Scott completed one and did a great job not only building the boat, but documenting the process in photos. That’s his boat at the top of this page, with a removable rowing seat he added later. You can also see some of the fine woodwork and stainless steel fittings he used, many of which he made himself.
Don Scott’s centerboard and case.
Don’s centerboard in place.
Don’s rowing seat.
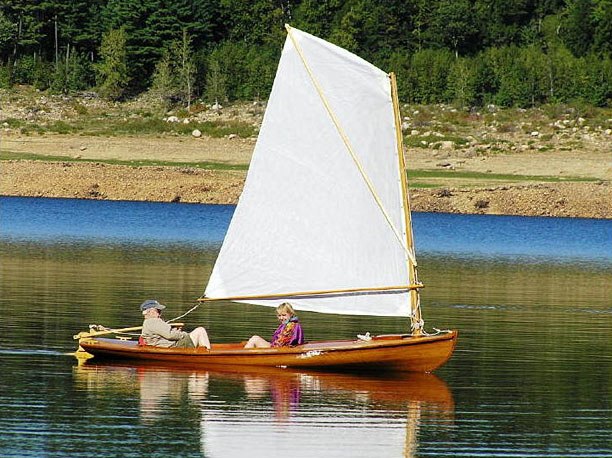
Rounding out the survey of larger boats is one built by Dale Andrews. With construction starting in 1994, Dale’s is the earliest strip built Melonseed I’ve found so far. He already owned a Crawford daggerboard model, but wanted a bigger boat with a centerboard. Working from the Chappelle plans, he stretched the design to just over 15 feet, keeping the width the same. The longer cockpit gave him room for the centerboard without losing room for two adults. He kept the centerboard case as far forward as possible, choosing to stay with a modest sized sprit sail. He also left an opening in the deck for the centerboard to protrude, which both maximizes the size of the centerboard for the space and allows for access to the board in the event of a jam. He did a beautiful job, using cedar for the hull and cherry for trim. We’ve exchanged quite a few emails, and he’s generously shared many of his construction photos and methods.
Dale’s case under construction.
Dale’s finished boat.
Detail of Dale’s centerboard case, with the board retracted up through the slot.
Dale sailing with his daughter, Lenna.
Smaller boats, however, have fewer options when it comes to placement of the centerboard case, and the ergonomics are far more limiting. Often builders have to settle for some compromise between comfort and performance. Some lean more one way, and some more the other, depending on their priorities, and some make many adjustments in other parts of the boat in order to maximize both.
Phil Maynard loves to tinker with designs, and really enjoys the challenge of an engineering problem. When he built a 13.5 foot boat a few years ago, though his construction methods were unique, he initially followed the original design parameters, with a daggerboard and a sprit sail. But Phil likes to go camping on Assateaque Island several times a year, and that involves a long sail across a very shallow sound, and he found the daggerboard arrangement troublesome in such shallow water. He wanted to convert to a centerboard, but he didn’t want to give up any cockpit space for camping gear. As a result, he ended up modifying several key components, but arrived at a configuration that works very well. He raised the deck crown to maximize under deck storage for gear, and this allowed him to use the extra height for a wider board. He went even further by leaving the slot open at the top so the board could use the full height of the deck and be operated from above. Then he changed the sail rig from sprit to marconi, which kept the sail’s center of effort far forward. All of these changes together made it possible to keep the boat well balanced and still maximized space in the cockpit. He says if he were to start over, he would try bilge boards next time, which are essentially two small centerboards positioned along the sides under the side decks like down stretched wings. That would give him the full under deck area for storage, and he could add floatation between the bilge boards and the hull where space is currently of little use. I don’t have any good pictures of his boat to post here, but you can see progress pictures of the earlier iterations and some sailing video of the finished boat at his website:
Sam Devlin, a West Coast boat designer for modern construction methods, drew a stitch-and-glue version of the 13.5 foot Melonseed several years ago. His plans include a centerboard, and they represent the opposite extreme, positioning the board for optimum sailing performance over comfort and space. His centerboard case, positioned to take full advantage of a large sail, takes up most of the front half of the cockpit. Joel Bergen did a nice job on one recently, and he says the boat sails very well. He tells me the space taken up by the centerboard does make this more a one and a half person boat than a two person boat, unless one of you is quite thin. Devlin drew the case with a wide plank on top to be used as a rowing seat, which does work as intended, but also takes up even more precious space. Joel says he spoke to Devlin recently at a boat show, and Devlin indicated he’s been thinking about redrawing the plans to make the cockpit more spacious. Joel was just cutting his teeth on the Melonseed, apparently. He recently finished a John Welsford Navigator he calls “Ellie” and did a beautiful job. His log of photos and sailing adventures is here: Joel’s Navigator Site.
Joel’s Zephyr, a Devlin design.
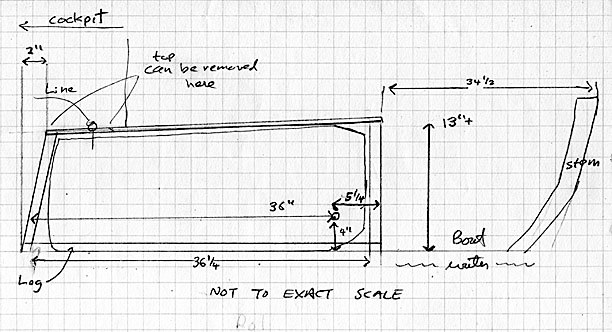
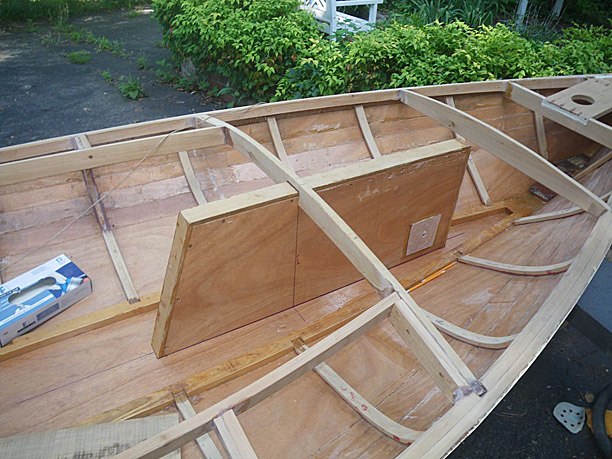
Next are two models that fall somewhere in between the extremes. Last year both Steve Lansdowne and Jim Farrelly finished 13.5 foot boats built to Marc Barto’s plans. Steve has been to the Wooden Boat School several times taking classes, and during the course of his build spent a long time working out the details to convert the daggerboard in the plans to a centerboard. He and Jim corresponded about it extensively, as they were building their boats at the same time. Both wanted to use the larger Barto sail plan of 72 square feet, and this necessitates extending the case into the cockpit about twelve inches. They’ve kept the case itself narrow, though, so there’s still room on each side for an adult to lean back comfortably.
Steve’s diagram.
Steve’s finished case and cockpit.
Steve adjusts a hatch cover to a flotations compartment in the rear.
Jim’s case under construction.
Case sealed with Dolphinite, before cleanup.
Jim’s finished case.
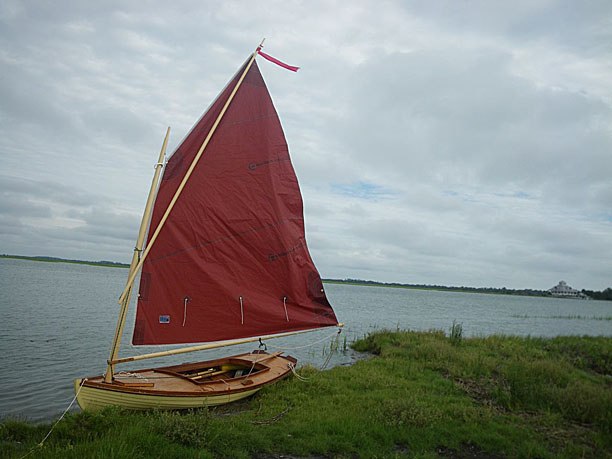
Jim’s finished Melonseed, rigging up.
Last, but not least, is the design used by Roger Crawford, which in many ways sets the standard. Roger has generously shared his measurements, photos and design philosophy with many builders, including me, and most start by studying his boats closely. Carl Weissinger, for instance, followed Roger’s dimensions and methods throughout when he built a 13.5 foot boat in cedar strips for himself, and ended up with at a very similar craft that he now sails, and Carl tells me it’s the only boat his wife feels comfortable in.
Carl’s Melonseed.
Detail of Carl’s centerboard placement.
I don’t know how long Roger spent tinkering and tweaking to arrive at his solution, but he managed to juggle a combination of small compromises that results in an arrangement both simple and elegant that performs well. He started by keeping the sail size modest at 62 square feet and positioned it well forward. The case then extends the full length of the forward deck, starting at the hatch, and runs all the way back and into the cockpit about six inches. The case is narrow, too, which helps minimize it’s footprint. The size and forward placement of the board increases the weather helm slightly over a daggerboard, but only a little. Each of these small adjustments adds up to a comfortable and seaworthy boat that sails extremely well.
Doug Lawson’s Crawford boat, PIe – centerboard detail.
Full view of a Crawford cockpit.
After considering all the options, I’ve tried to come up with something that follows the Crawford model in many respects, but am attempting to reclaim some of the small compromises made to get there, making slight improvements where possible.
My first prototype, though, took the form of something entirely different; and from that I learned an interesting concept that may be used on the final model.
(Note: Most of the photos in this post were supplied by the owners.)
melonseed skiff, mellonseed skiff, melon seed, mellon seed












If you can provide insight into reply/above, would appreciate it.
Nothing wrong with steel if you can get it. On some designs, when you need the ballast, it’s required. For the average builder, steel is both expensive and difficult to work using typically home shop tools – not everyone has a cutting torch or machine shop. Otherwise it would be used more often. If you have what you need to work it, I’d go for it.
Hi…
Beautiful job, and could use some advice on centerboard case now building for an 11-foot sailing flattie. Two questions:
First, with a centerboard that will be .8 inch thick, what do your recommend as the width of the case to provide strength, but make sure does not bind? Board will be made of plywood, treated to not absorb water.
Second, any advice on placement of the pivot. I can place it approx. 4 inches above bottom, clearing bedlog and that will have it out of water. Is that ok? But not sure how far is best back from the forward part of the case to allow best swivel point? board if 10″ by 34″ overall.
Thanks
Jeff Daniels
PS. Your photos gave me great insight into construction of my cap. Thanks.
Hi Jeff,
If I were to make mine again, I might make my slots a bit wider than they are now. There’s very little slop. They don’t bind at all under normal conditions, but when running up on a beach, the force of the wash is strong enough to blast sand and grit up into the case, and this can cause the board to jam. I think more clearance would let that stuff wash back out. Rule of thumb, I gather, is make the slop slightly larger than the largest pebbles likely to get suspend in the water and washed up into the case. There’s no magic number, but 1/8″ on both sides seems common. Trouble is, the more slop you build into the case the more rattle and vibration you’ll get from the board while underway, and besides the annoying noise, it robs you of speed. So you sort of have to choose your she-devil and dance with her.
On the second question, it totally depends on how far down your board will be when fully extended. If your board will go all the way down to vertical, then your 4″ sounds right (will also have to be 4″ back, I think). A little more would be better. If your board will only extend down 45 degrees, then you could easily get by with just 2″. You just want enough “bury” of the board in the case to be able to counteract the force of water, leveraged on the long end when extended. Imagine if you clamped part of your board in a vise, how much force you could exert on it before it snapped. With a long board and only a little bit held in the vise, it wouldn’t take much. Your .8″ thick board, if it’s glassed, will be very strong.
Buying a used car can be tricky, no matter how much you already
know about cars. There are lots of different things to consider so that you don’t end up buying a piece of junk that breaks down right away. Use some great tips of the trade in the following article to help you make your next car choice.
Hello,
37 years ago I built myself a sailing boat with my friends.
Now I made a blog with information about how to make a boat with sails.
Because when I did not have a camera now I called a few photos here on my blog. I do not mind, and thanks for the help.
Instead you can provide the original plans of my boat.
I have to add more information about the construction barcii.Daca are interested, you can follow my blog.
I like your blog and I visit it often.